
The Complete Guide to Pokémon GO
Official Tutorial Pages for Beginners
How to Catch Pokémon with Pokéballs
How to Throw a Pokéball
When you first enter an encounter, the Pokémon is usually very close to the camera, but after its first Pokéball escape will appear farther away and stay at that distance.
Catches are rumored to be increased in probability the more centered your throw is. Also, the smaller the inner circle, the greater your chance of a catch. The closer you are to the inner circle, the better the chances of catching.
Pokémon Catch Difficulty
Pokémon catch circles range from green (easiest to catch) to red (hardest to catch) with shades in-between.
Pokémon can run away if you hit them with a Pokéball and they escape from it. If you don’t throw a ball they won’t run.
Razz Berries apply on the next Pokéball that hits the target, so on every hit you may want to re-apply the berry for rare Pokémon. Great Balls and Ultra Balls (unlocked at higher levels) lower the difficulty automatically.
Pokemon become exponentially more difficult to capture after trainer level 15 leading to ball shortages. You can get around this with trick shots and ball recovery, but it can get very frustrating. Workarounds include going to pokemon-light areas with many pokestops, or avoid catching anything unless it is either very low-level and easy to catch, or something rare or high CP that you want to use actively.
Pokéball Toss Experience Bonuses
Depending on how you throw the Pokéball and the size of the circle, you can get different Pokéball toss bonuses.
Go for GREATs consistently for 50% more exp, especially if the Pokémon is near the camera and thus easier to hit.
-
Curveball - 10 exp
-
Spin the Pokéball in circles before you throw until it turns golden. You MUST land it inside the inner circle for this exp bonus to .
-
Not recommended since it makes the shot harder except for easy catches.
-
Nice - 10 exp
-
Hit the Pokémon within the inner circle when it is large to get this bonus
-
Recommended for Pokémon that are easy to catch
-
Great - 50 exp
-
Hit the Pokémon within the inner circle when it is medium-sized to get this bonus
-
Recommended for Pokémon that are hard to catch (yellow-red)
-
Excellent - 100 exp
-
Hit the Pokémon within the inner circle when it is very small to get this bonus
-
Not recommended unless super rare; too friggin’ hard to do consistently
Curveball - 10 exp
- Spin the Pokéball in circles before you throw until it turns golden. You MUST land it inside the inner circle for this exp bonus to .
- Not recommended since it makes the shot harder except for easy catches.
Nice - 10 exp
- Hit the Pokémon within the inner circle when it is large to get this bonus
- Recommended for Pokémon that are easy to catch
Great - 50 exp
- Hit the Pokémon within the inner circle when it is medium-sized to get this bonus
- Recommended for Pokémon that are hard to catch (yellow-red)
Excellent - 100 exp
- Hit the Pokémon within the inner circle when it is very small to get this bonus
- Not recommended unless super rare; too friggin’ hard to do consistently
Finding Pokémon
Nearby Pokémon
When a Pokémon appears in your nearby list, it will have a number of footprints depending on distance. In the preview, the three closest Pokémon will be listed in reverse order. Some 3 footstep Pokémon are phantom Pokémon and don’t actually exist anymore; check out the glitches section for more info.
Spawn Frequency
Pokémon appear to spawn more frequently in areas of high cellular data usage, so well-trafficked areas are your best bet for finding Pokémon, especially cities, malls, shopping centers, and the like. Residential and rural areas appear to have a dearth of Pokémon. Rarer Pokémon also appear to spawn more often in locations with many people.
There also appear to be special spawn zones for specific Pokémon, for instance a park where Charmander spawn every 15 minutes. You’ll have to ask people in your area if they know any good specific hunting spots!
Pokémon by Location
These are all just best guesses based on anecdotal evidence, so take with a grain of salt. Very roughly sorted by rarity. A region can qualify as multiple areas at the same time, in which case any Pokémon from any of the lists can spawn there.
This section is in progress so the data may be wildly inaccurate.
-
Everywhere
-
Ratata
-
Pidgey
-
Venonat
-
Paras
-
Zubat
-
Nidoran
-
Eevee
-
City
-
Meowth
-
Wetlands
-
Drowzee
-
Plains/Desert (Perhaps Splittable to Arid and Plains)
-
Geodude
-
Sandshrew
-
Doduo
-
Cubone
-
Ekans
-
Mankey
-
Rhyhorn
-
Machop
-
Growlithe
-
Ponyta
-
Vulpix
-
Forest
-
Weedle
-
Caterpie
-
Bellsprout
-
Oddish
-
Spearow
-
Water (Ocean, Rivers, Wetlands)
-
Magikarp
-
Omanyte
-
Kabuto
-
Goldeen
-
Horsea
-
Tentacool
-
Krabby
-
Psyduck
-
Staryu
-
Slowpoke
-
Psyduck
-
Dratini
-
Amusement Parks
-
Electabuzz
-
Voltorb
-
Magnemite
-
Pikachu
-
Sunset/Night/Overcast
-
Gastly
-
Australia
-
Kangaskhan
-
North America
-
Tauros
Everywhere
- Ratata
- Pidgey
- Venonat
- Paras
- Zubat
- Nidoran
- Eevee
City
- Meowth
Wetlands
- Drowzee
Plains/Desert (Perhaps Splittable to Arid and Plains)
- Geodude
- Sandshrew
- Doduo
- Cubone
- Ekans
- Mankey
- Rhyhorn
- Machop
- Growlithe
- Ponyta
- Vulpix
Forest
- Weedle
- Caterpie
- Bellsprout
- Oddish
- Spearow
Water (Ocean, Rivers, Wetlands)
- Magikarp
- Omanyte
- Kabuto
- Goldeen
- Horsea
- Tentacool
- Krabby
- Psyduck
- Staryu
- Slowpoke
- Psyduck
- Dratini
Amusement Parks
- Electabuzz
- Voltorb
- Magnemite
- Pikachu
Sunset/Night/Overcast
- Gastly
Australia
- Kangaskhan
North America
- Tauros
Tall Grass
Ever notice the shaky leafy piles you see while walking around in Pokémon populated areas, especially around parks? They are Pokémon spawners!
Pokémon appear to spawn in or around tall grass every hour on the same minute (XX:07 for instance). Tall grass spawned Pokémon appear to last 15 minutes and appear on your radar. Tall grass does not change location or disappear. It is unknown if rare Pokémon can spawn on tall grass.
Incense and Lured Pokémon
When a lure is dropped on a Pokéstop, Pokémon will appear there roughly every 5 minutes. These Pokémon do not show up on your radar and despawn quicker than normal, lasting only around 2.5 minutes.
Incense works in a similar manner but other trainers cannot see Pokémon attracted by incense, only you can.
Incense and Lures appear to attract Pokémon that would spawn in that region naturally.
Trainer Level
The max CP of the Pokémon you encounter increases based on your trainer level. The Pokémon will appear to have the same CP if two trainers are exactly the same level. However, this does mean that a lower level trainer can find a higher CP Pokémon.
Gyms
Once you are level 5 and have picked a team, gyms can be challenged in order to make slots for you to defend them, but differ based on allied or enemy gyms. The higher the level of gym, the more player slots it can support. This level raises and lowers depending on the prestige of the gym. A button on the bottom-right allows you to enter combat against a gym’s inhabitants.
From the beta, the max gym level was level 30 providing 21 defense slots.
Allied Gyms
Allied gyms can be trained at by a single Pokémon. You enter a 1 against all scenario from the weakest to the strongest in the gym. Successfully winning against at least 1 Pokémon increases your gym’s prestige.
When the gym gains a level, anyone on your team can slot a Pokémon into it. If an allied gym has an open slot, a new button appears on the bottom-left that allows you to help defend the gym. An individual cannot slot more than one Pokémon to any given gym.
The Pokémon you add enters the gym in CP order from lowest to highest, so it’s sometimes helpful to boost its CP by a little to be slightly stronger than another Pokémon there. The Pokémon you add MUST be at maximum health. That Pokémon becomes unusable until the gym’s level falls to a point where your Pokémon is ejected from the gym at 1HP. Because of CP ordering, the weakest Pokémon get ejected first.
Training against allied gyms cannot drop your Pokémon below 1HP and thus do not require the use of Revives to heal your Pokémon.
Strategy
Using a Pokémon with way higher CP only grants about 100 exp per win. Using a Pokémon slightly stronger grants about 250 exp per win. Using a Pokémon with slightly lower CP grants about 500 exp per win. Exploit this by using a Pokémon slightly lower CP than the current weakest Pokémon in the gym that is resistant to/super effective against it, and then run away on the second opponent to save on potions. If you are good at dodging, you can also wipe out 2+ Pokémon of higher level in a row if you’re consistent. You will retain all earned exp and prestige even if you run or die.
Enemy Gyms
Enemy gyms can be attacked by a team of 6 Pokémon per person. Multiple trainers can also attack a gym at the same time and you will double-team the active Pokémon. Defeating at least 1 Pokémon reduces the gym’s prestige. As the prestige level drops, the gym level drops. When the gym hits 0 prestige, it becomes a neutral gym and any team can claim it even if they did not participate in attacking the gym, so be quick to claim!
If one of your Pokémon is reduced to 0HP by an enemy gym, you must use a Revive to revive it.
Strategy
Attack enemy gyms with a group of people to quickly reduce it down to 0 since you can double-team Pokémon by attacking at the same time. If you can’t defeat the enemy, don’t be afraid to run away or switch Pokémon.
For every enemy Pokémon you defeat, you will reduce the enemy gym’s prestige by about 1000. Defeating every enemy Pokémon in one go gives roughly a 500 prestige bonus.
Combat Basics
There are three types of actions you can perform, basic attacks, special attacks, and dodging. After performing one, you must completely wait for the action to complete before taking another action due to recovery frames/global cooldown. Basic attacks and special attacks can have different speeds depending on the individual move.
The simplest way to fight is to tap repeatedly, which spams your basic attack and charges your special bar.
If your special is super effective against your target it might be worth it to use it. Tap and hold when one of the mini-bars is filled under your life bar to activate a special. Note that the bar must finish filling when your global cooldowns are off (meaning you’re not currently attacking or dodging) or the special won’t activate. If the bar finishes filling while you’re still performing another action, nothing will happen (instead of queuing it up).
You can also swap Pokémon against an enemy gym, or run away against any gym (each has a corresponding button if available) in order to avoid your Pokémon sustaining more damage or in the case of enemy gyms getting knocked out.
Dodging
Dodging is pretty easy to do if your connection and fps is stable. When the white/yellow zappy indicators appear around the edges of your screen, swipe left or right in reaction to attempt to dodge the attack (when you’re not in recovery frames/global cooldown from another action). If your reflexes are good, you might actually have to wait and swipe at the exact moment the indicator disappears, which is roughly 0.25 seconds after it first appears.
Generally an enemy Pokémon leads off with a double basic attack (dodge twice in a row) and then proceeds to do a basic attack on cooldown until they use a special or series of specials. Between basic attacks you can normally get in 1-3 basic attacks, depending on the speed of your basic attack. Generally, lower damage basic attacks are faster. If you are skilled and your connection is reliable then you can defeat even high-level gyms with this technique with ease. Dodging is generally easier with a faster basic attack. Sometimes you can sneak in extra hits before and after the enemy uses a special because of the longer cast time and the longer global cooldown/recovery frames.
Every action you take (basic attack, special, dodge) locks you out of performing any other actions until the command has completed, like recovery frames/global cooldown/lockout.
Learning to Dodge
If you have plenty of revives and potions, just challenge any gym with a high CP Pokémon that can tank a few hits, don’t attack, and just repeatedly try to time the dodge after the yellow flash. If you want to save on those items (usually people have too many), then you can use Pokémon that you would transfer anyway and fight with them as sacrifices, since you can still transfer them even if they’re unconscious.
Once you get the timing down for dodging alone, try to weave one or two attacks between each dodge and learn the cooldown timings of your basic attacks.
Undodgeable Moves
Not confirmed, but there may be some moves that cannot be dodged since they may have no yellow indicator.
-
Blizzard
Blizzard
Rewards
Once every 21 hours, you can go to the Shop page and click the top-right button to claim 10 PokeCoins and 500 Stardust per gym you currently defend, up to a maximum of 10 gym rewards. You can still defend gyms beyond this, but you will not get any rewards for them.
This means that you can capture/add a Pokémon to 10 gyms in 10 minutes, cash in for the maximum 10 gym reward, and then lose all the gyms for 21 hours, and then do the same thing the next day.
Reward resets 21 hours from when you collect it in the shop menu. A timer will show you how long until next collection.
Pokémon CP and Stats
Checking Max CP
When you view a specific Pokémon’s stats, at the top is a semi-circle with a white dot. The left-most end of the arc is the minimum CP that Pokémon is possible to have. The right-most end of the arc is the maximum CP for your trainer level that that Pokémon can achieve. Raising trainer level increases this cap.
RNG and Stats
The max health of a Pokémon is random, even if the CP is the same. The max CP of a Pokémon increases as your trainer level increases, and can also vary slightly from specimen to specimen.
Size and height are also random, but do not appear to affect any important stats.
Movesets
The moveset of a Pokémon is random and changes upon evolution. Every move has a corresponding damage value. Generally, the smaller the value, the faster the attack and shorter the cooldown. Specials also have a charge bar value. The smaller each section of the bar, the faster it will charge and usually the faster it will cast. The number of sections is how many charges you can store to use in a row.
The type of move you want depends on what you want to use the Pokémon for. If you really need to beat fire and rock Pokémon, maybe you want your Sandshrew to know ground-type moves. However, if you want to defend a gym and expect rock-type of Pokémon to counter you, it might be a good idea to have your Electabuzz know fighting-type moves after all; it’s all very situational. Normal type moves though are usually waste since they aren’t super-effective against anything.
Evolving and Upgrading
In general, it’s safer to evolve first so you know what moves the Pokémon has before you invest in upgrading it with stardust.
Evolving tends to roughly double the original CP since evolved forms have a much higher CP cap, but this varies depending on the specific type of Pokémon. For instance, Raticates are roughly double a Rattata but Arcanine’s are almost triple their Growlithe pre-evolution.
A Pokémon’s moves can change with evolution.
Size (XS or XL) does not get carried over with evolution.
CP Tier List
All Pokémon are not created equal; they have different base max CP caps and different amounts of CP per upgrade.
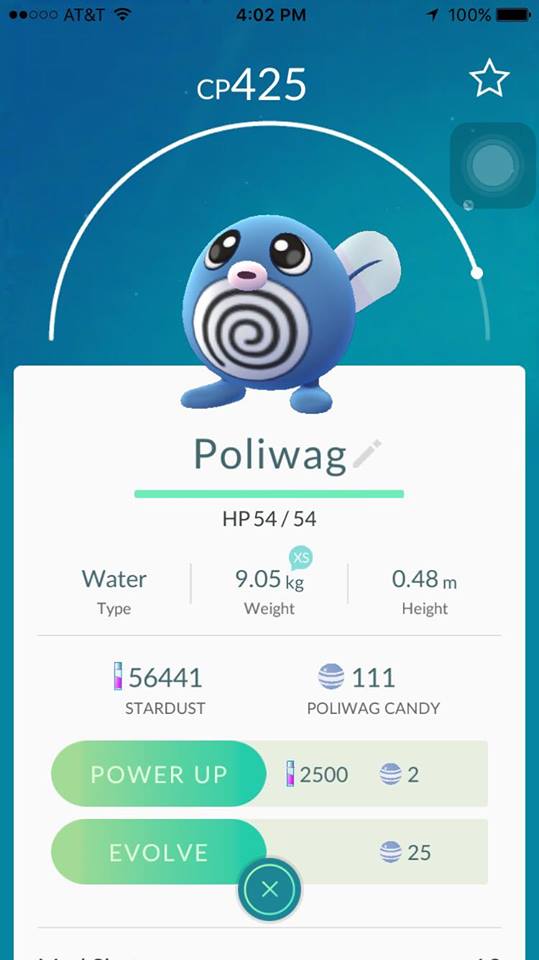
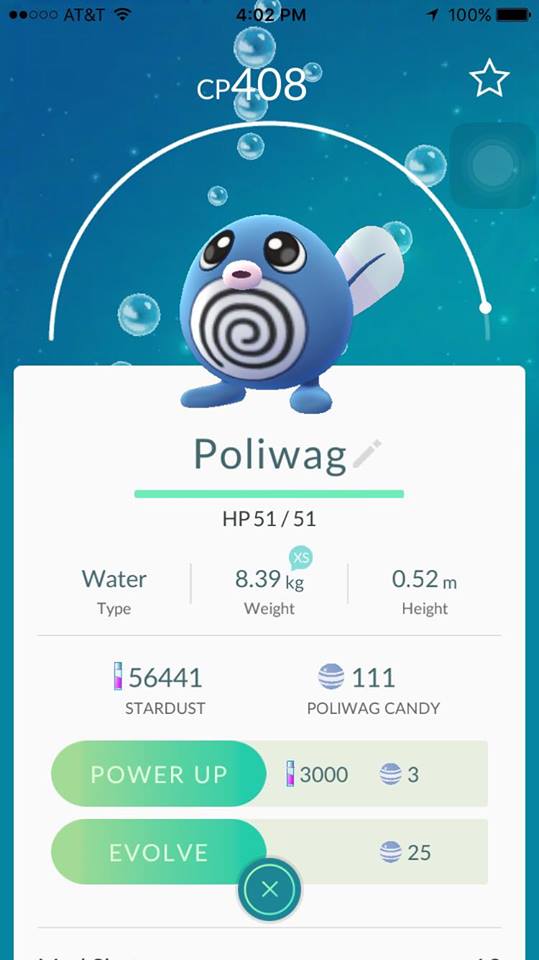
Upgrading Costs
The cost to upgrade a Pokémon increases the closer it is to CP cap. For instance, if you leveled up, it might decrease the cost to upgrade in terms of stardust and candy since the % to CP cap will decrease.
For instance, take these two Poliwags. Even though the CP425 Poliwag is higher CP, it is farther from the cap, so it is cheaper to power it up. If you leveled up, both would move farther from CP cap and may thus become cheaper to upgrade.
Trainer Level and Experience
Trainer Level Rewards and Unlocks
Experience for Common Actions
Lucky Egg doubles all of these values; see the EXP and Power Leveling section in Tips.
Action
Experience
Comments
Curve Ball (Pokéball Toss)
10
Spin the ball before you throw and land in circle
Nice (Pokéball Toss)
10
Land in large circle
Great (Pokéball Toss)
50
Land in medium circle
Excellent (Pokéball Toss)
100
Land in small circle
Pokéstop
50
Activate a Pokéstop
Catch a Pokémon
100
Evolve a Pokémon
500
Discover New Pokémon
500
Hatch an Egg
1000
Action
|
Experience
|
Comments
|
Curve Ball (Pokéball Toss)
|
10
|
Spin the ball before you throw and land in circle
|
Nice (Pokéball Toss)
|
10
|
Land in large circle
|
Great (Pokéball Toss)
|
50
|
Land in medium circle
|
Excellent (Pokéball Toss)
|
100
|
Land in small circle
|
Pokéstop
|
50
|
Activate a Pokéstop
|
Catch a Pokémon
|
100
| |
Evolve a Pokémon
|
500
| |
Discover New Pokémon
|
500
| |
Hatch an Egg
|
1000
|
Known Glitches/Bugs
Login Servers Failing
Keep spamming login and eventually it will let you through. Be careful logging in at peak times such as 11am-4pm as they have a tendency to go down around then.
Pokéball Doesn’t Wiggle on Hit and Freezes
You must restart the game. This seems to occur much more frequently on less stable internet connections and especially if there are many people playing the game at the same time in your area. This throw however does count, and you can catch on this glitched throw. Check your journal when you get back into game to see if you caught it. If you missed the catch, it is likely the Pokémon is still in the same location with the same CP as before. Can avoid this by moving to a slightly less populated area (tip of the pier instead of in the mass of people for instance).
1HP Enemy Gym Pokémon
Enemy gyms tend to experience the “1HP Glitch” where the defending Pokémon becomes invincible at 1HP and cannot die. In this situation, you can either run away or close the game and open it again. This glitch appears to affect specific Pokémon in gyms, so it’s probably best to attack a different gym or avoid attacking enemy gyms at all to avoid experiencing this glitch. No known workaround as of right now.
UPDATE: Seems to have been fixed or at least lessened, will remove this section when confirmed fixed 100%.
Phantom Pokémon
When a Pokémon despawns, sometimes it doesn’t get removed from your nearby Pokémon list and will permanently appear to be 3 steps away. To clear out the phantoms and leave only the real, close the app and reopen it.
Cannot Click Non-UI Elements after Power Save Mode
Other buttons work but can’t rotate camera or click objects in the game. Must restart the game to fix. To avoid, just don’t run too fast in power save mode. Seems to never occur while stationary and in power save mode.
Switching To Item Bag In Combat Locks the Screen
This only happens when you open the item bag before or as the pokemon is running away from battle. Screen will lock; you must restart the app. No workaround.
Random Tips
Egg Contents by Distance
EXP and Power Leveling
-
Evolve Pokemon with Lucky Egg on to get another +1000 EXP, even if you already have the new species. Save up 30+ Pokémon to be evolved all at once for maximum benefits.
-
Maximum player level is rumored to be 50 from alpha/beta testers
Evolve Pokemon with Lucky Egg on to get another +1000 EXP, even if you already have the new species. Save up 30+ Pokémon to be evolved all at once for maximum benefits.
Maximum player level is rumored to be 50 from alpha/beta testers
Pokéstop Tips
-
Pokéstops reset every 5 minutes
-
Even if it fails to load or says “Please try again later”, you will still collect items when you spin. Check your journal to confirm
-
Spinning a Pokéstop and immediately hitting the x to close it instantly grabs you the items
Pokéstops reset every 5 minutes
Even if it fails to load or says “Please try again later”, you will still collect items when you spin. Check your journal to confirm
Spinning a Pokéstop and immediately hitting the x to close it instantly grabs you the items
Clearing Out Item Space
-
If you don’t fight a lot of enemy gyms, revives can be thrown out entirely
-
If you fight enemy gyms but are good about running or switching Pokémon when they’re about to faint, you can probably still throw out most of your revives
-
If you don’t fight any gyms at all, throwing away your weakest potions to make room for Pokéballs is probably a good idea
-
You can tap and hold the + button to quickly increment the items you toss instead of tapping repeatedly
If you don’t fight a lot of enemy gyms, revives can be thrown out entirely
If you fight enemy gyms but are good about running or switching Pokémon when they’re about to faint, you can probably still throw out most of your revives
If you don’t fight any gyms at all, throwing away your weakest potions to make room for Pokéballs is probably a good idea
You can tap and hold the + button to quickly increment the items you toss instead of tapping repeatedly
Battery Power Saving
-
Capture Pokemon with AR off
-
Turn off music & sound effects
-
Turn on Battery Saver, then flip the phone upside down to dim screen while game still active
-
Check every time you have to log in, the game resets your sound, battery saver, and AR settings every time you login
Capture Pokemon with AR off
Turn off music & sound effects
Turn on Battery Saver, then flip the phone upside down to dim screen while game still active
Check every time you have to log in, the game resets your sound, battery saver, and AR settings every time you login
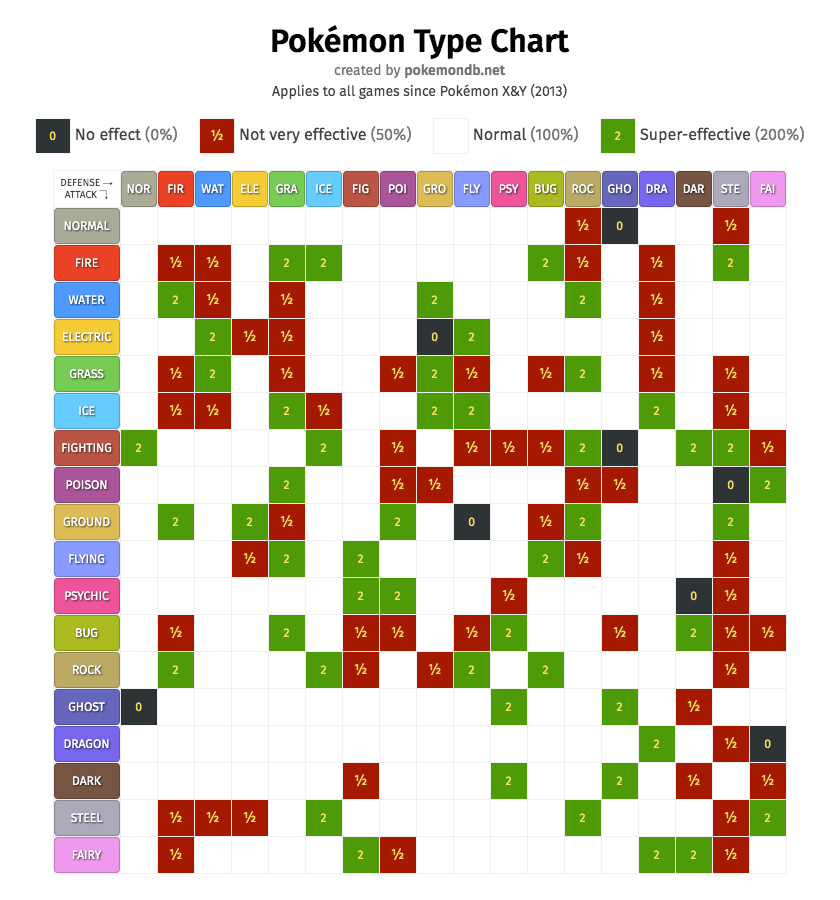
Type Advantages/Weaknesses
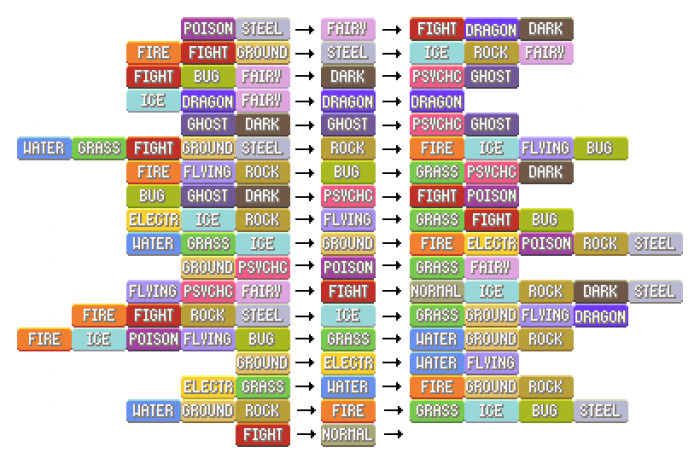
Generation 6+ type chart: https://img.pokemondb.net/images/typechart.png
Easter Eggs
Pikachu As a Starter
When you first start the game, don’t pick any of the starters and just keep walking away from them. They should respawn near your new location on occasion. After refusing them roughly 5 times, a Pikachu will appear; select that instead.
False Rumors
Eevees Evolve Based on Special Move
Across different people, the special move was inconsistent. Jolteon was about 33% split for each move, Flareon was around 40% Dig, Vaporeon was about 40% Swift. It is possible that for an individual, their own Eevee’s specials may evolve the same every time, but it is not confirmed.
Size and Height Affect Stuff
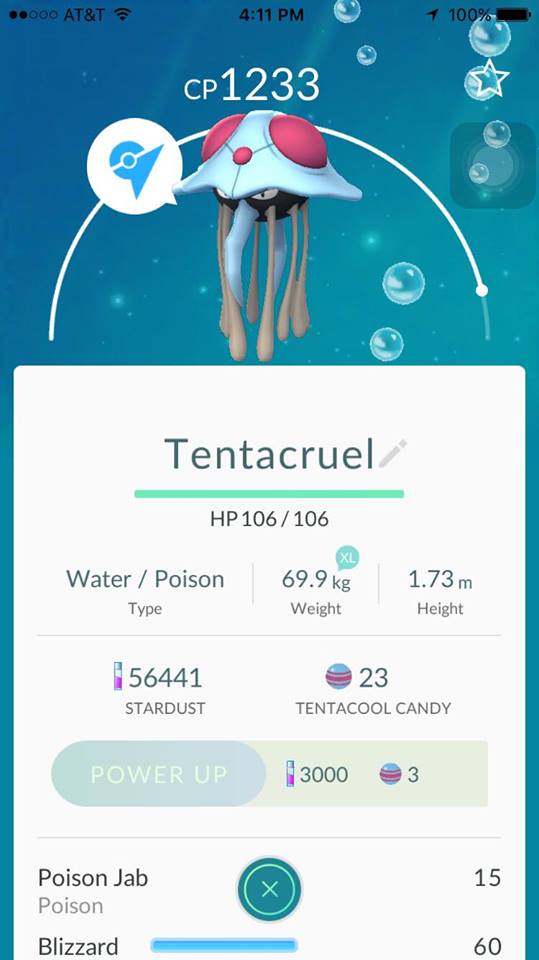
Very similar Tentacruels, vastly different weight/height.


Rapidly this kind of internet site can easily unquestionably recognition among virtually all blogging and site-building and also site-building individuals, to be able to the meticulous content or simply opinions. guias pokemon go
ReplyDelete